Ultimate Guide: Soundproofing Your Home in 6 Months
Achieve a tranquil living environment by implementing effective soundproofing home methods, ensuring a quieter and more comfortable sanctuary within a practical six-month timeframe for enhanced well-being.
Are you constantly battling unwanted noise in your home, yearning for a peaceful sanctuary where you can truly relax? If the answer is yes, then understanding soundproofing home methods is your first step towards achieving that dream. This comprehensive guide will walk you through four proven strategies to transform your living space into a quieter, more comfortable haven within six months, significantly improving your quality of life.
understanding the science of sound and its impact
Before diving into practical soundproofing home methods, it’s crucial to grasp the basics of how sound travels and affects us. Sound is essentially vibration, moving through air, solids, and liquids. In a home, it often travels through walls, floors, ceilings, windows, and doors. Understanding these pathways is key to effectively mitigating noise pollution.
The impact of unwanted noise extends beyond mere annoyance. Chronic exposure to noise can lead to stress, sleep disturbances, reduced concentration, and even long-term health issues. Creating a quiet environment is not just about comfort; it’s about fostering a healthier, more productive lifestyle. Identifying the sources and types of noise – whether airborne (voices, music) or impact (footsteps, banging) – will inform the most suitable soundproofing approach for your specific needs.
Different materials and construction techniques have varying abilities to block or absorb sound. Dense, heavy materials are generally better at blocking airborne sound, while softer, porous materials excel at absorbing sound energy, reducing echoes and reverberation. A combination of these strategies often yields the best results. By understanding these fundamental principles, you can make informed decisions about which soundproofing solutions are most appropriate for your home and budget.
In essence, effective soundproofing is a multi-faceted endeavor that begins with a clear understanding of acoustic principles. This foundational knowledge empowers you to select and implement the right techniques, ensuring your efforts lead to a genuinely quieter and more comfortable home environment, free from the incessant intrusion of external noise.
method 1: sealing air gaps and reinforcing weak points
One of the most overlooked yet effective soundproofing home methods involves sealing air gaps and reinforcing weak points in your home’s structure. Sound, much like water, will always find the path of least resistance. Even the smallest cracks and crevices can allow a significant amount of noise to penetrate your living space.
windows and doors: your primary noise gateways
Windows and doors are often the biggest culprits when it comes to noise intrusion. They are not typically as dense or as well-sealed as walls, making them prime targets for sound leakage. Addressing these areas can yield substantial improvements.
- Weatherstripping and door sweeps: Install high-quality weatherstripping around all window and door frames. A door sweep at the bottom of exterior doors can prevent sound from entering beneath.
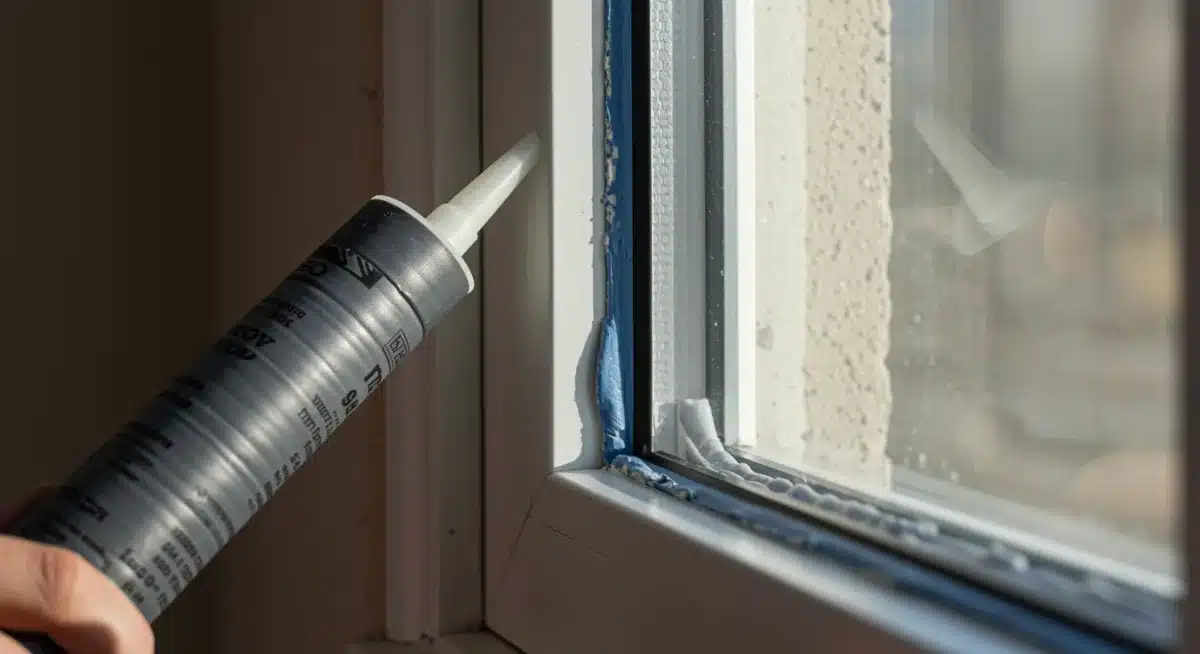
- Acoustic caulk: Use acoustic caulk to seal any gaps around window and door frames, as well as where walls meet ceilings and floors. This specialized caulk remains flexible, preventing cracks from forming as the house settles.
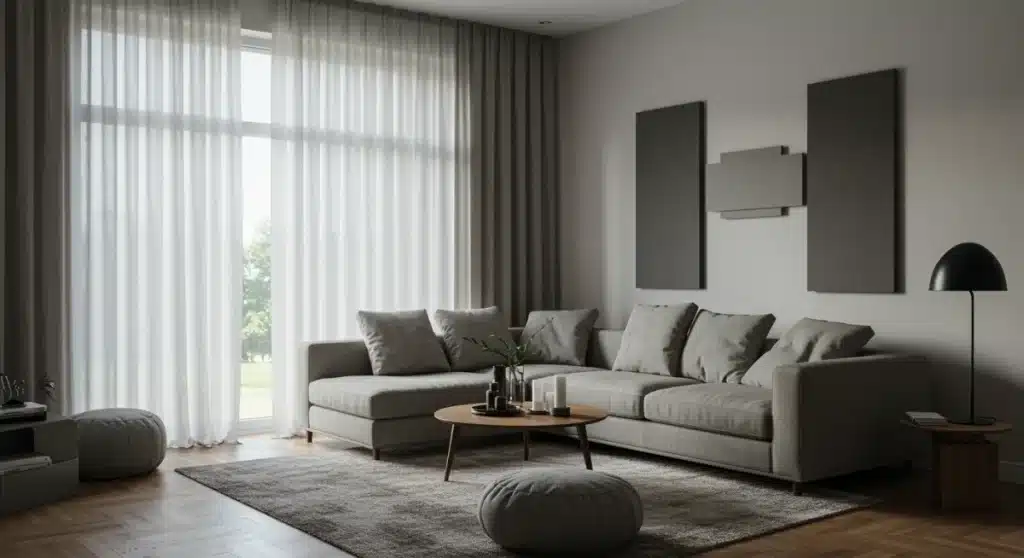
- Heavy curtains or drapes: While not strictly sound blocking, heavy, thick curtains or drapes can absorb some airborne sound and help reduce echoes within a room, especially when made from dense fabrics like velvet or thermal materials.
Beyond windows and doors, inspect electrical outlets, light fixtures, and plumbing penetrations. These seemingly minor openings can still contribute to noise problems. Fill any gaps around these fixtures with acoustic sealant or foam. Reinforcing the frames of windows and doors can also improve their sound-blocking capabilities by increasing their mass and reducing vibrations.
By diligently identifying and sealing these vulnerable points, you create a more robust barrier against external noise. This method is often the most cost-effective starting point for any soundproofing project, as it addresses fundamental issues of air leakage that compromise overall acoustic performance. It’s a foundational step that enhances the effectiveness of other soundproofing measures, laying the groundwork for a truly quiet home.
method 2: enhancing wall, ceiling, and floor insulation
Once air gaps are sealed, the next step in effective soundproofing home methods is to enhance the insulation of your walls, ceilings, and floors. This strategy focuses on adding mass and damping vibrations, two critical principles in noise reduction. Traditional insulation primarily deals with thermal regulation, but specific materials and techniques can significantly improve acoustic performance.
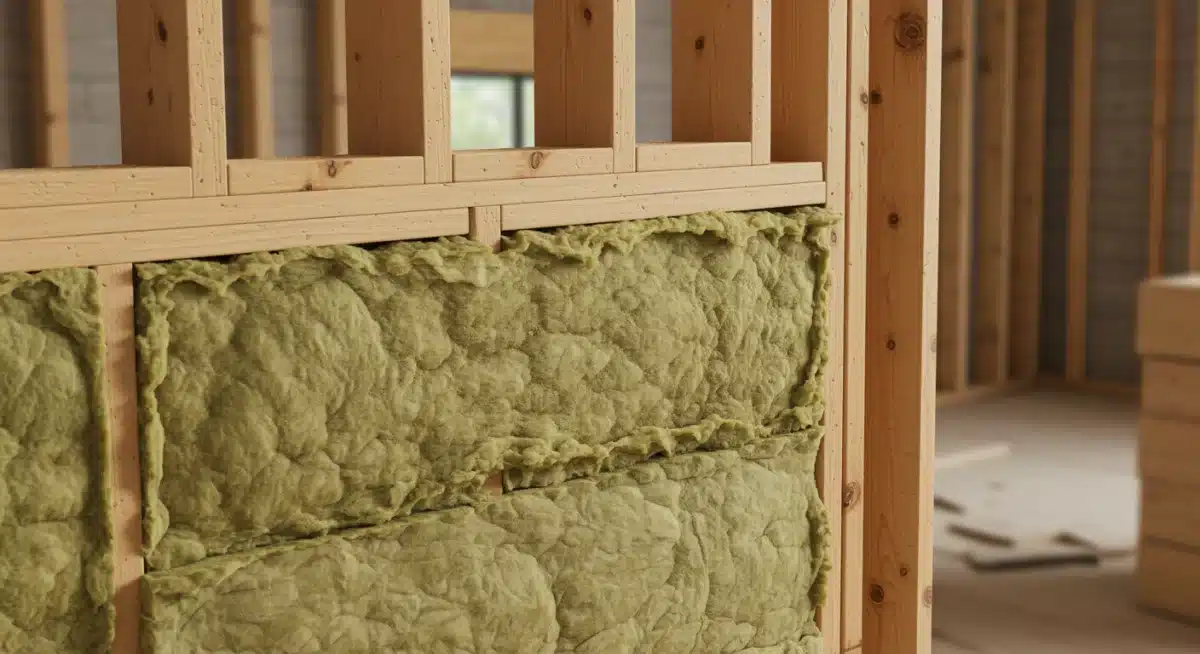
For walls, adding mass is a primary goal. This can be achieved by installing an additional layer of drywall, preferably a specialized acoustic drywall or a standard drywall combined with a sound-dampening compound like Green Glue. The viscoelastic properties of such compounds convert sound energy into heat, effectively reducing sound transmission. Staggering the seams of the drywall layers also helps prevent sound from finding a direct path through.
advanced wall and ceiling treatments
Beyond simple layering, more advanced techniques can be employed for walls and ceilings to further improve sound isolation. These methods involve creating decoupled structures that prevent sound vibrations from easily transferring from one side to the other.
- Resilient channels: Installing resilient channels before adding drywall creates a small air gap between the drywall and the studs, significantly reducing sound transmission by decoupling the surfaces.
- Mass loaded vinyl (MLV): This heavy, flexible material can be added within wall cavities or directly to existing surfaces to increase mass without adding significant thickness. It’s particularly effective for blocking low-frequency sounds.
- Blown-in insulation: For existing walls, blowing in cellulose or rockwool insulation can fill cavities and add density, absorbing sound within the wall structure.
For floors, impact noise (like footsteps) is often the main concern. Installing an underlayment specifically designed for sound reduction beneath hardwood, laminate, or tile flooring can make a considerable difference. These underlayments typically feature dense rubber, cork, or foam, which absorb impact energy. For carpeted floors, a thick pad can offer similar benefits. Decoupling the floor from the subfloor using resilient clips or a floating floor system can provide even greater sound isolation, especially in multi-story homes.
Enhancing insulation is a more involved process than sealing gaps but offers a dramatic improvement in soundproofing. It tackles the core structural pathways of sound, creating a much more robust barrier against noise. This method is particularly effective for reducing both airborne and impact noise, leading to a profound sense of quiet and privacy throughout your home.
method 3: incorporating acoustic absorption and diffusion
While blocking sound is essential, managing the sound within a room is equally important for creating a comfortable acoustic environment. This is where acoustic absorption and diffusion come into play, offering sophisticated soundproofing home methods that address echoes and reverberation. These techniques don’t necessarily block sound from entering or leaving a room but rather improve the quality of sound within the space, making it feel quieter and more pleasant.
the role of soft furnishings and dedicated panels
Acoustic absorption involves materials that convert sound energy into heat, preventing it from bouncing around the room. Common household items can contribute to this, but dedicated acoustic products offer superior performance.
- Thick rugs and carpets: These absorb sound reflections off hard floor surfaces, reducing overall reverberation. The thicker and denser the rug, the more effective it will be.
- Upholstered furniture: Sofas, armchairs, and other upholstered pieces provide soft surfaces that absorb sound, contrasting with hard, reflective surfaces like bare walls and glass.
- Acoustic panels: These are purpose-built panels made from materials like fiberglass or rockwool, covered in fabric. They are designed to absorb specific frequency ranges and can be strategically placed on walls and ceilings to eliminate echoes and reduce overall noise levels.
Diffusion, on the other hand, scatters sound waves, preventing them from creating harsh reflections or concentrated hot spots. Diffusers don’t absorb sound; instead, they break up sound waves and disperse them evenly throughout the room. This creates a more natural and balanced acoustic environment, particularly beneficial in larger rooms or home theaters where sound clarity is paramount.
Acoustic treatments are often the final touch in a comprehensive soundproofing strategy. They address the internal acoustics of a room, creating a space that not only blocks external noise but also feels acoustically balanced and calm. Combining absorption and diffusion allows for fine-tuning the soundscape of your home, ensuring that the quiet you’ve achieved through blocking methods is complemented by a pleasant and controlled internal sound environment. This holistic approach significantly contributes to the overall comfort and tranquility of your living space.
method 4: strategic placement of furniture and appliances
Beyond structural changes and specialized materials, one of the most accessible and often overlooked soundproofing home methods involves the strategic placement of furniture and appliances. While not a standalone solution, thoughtful arrangement can significantly contribute to noise reduction and acoustic comfort, working in conjunction with other methods.
Heavy furniture, such as bookshelves filled with books, large wardrobes, or dense cabinets, can act as effective sound barriers when placed against shared walls. By adding mass and disrupting sound waves, these items can help attenuate noise transmitting from an adjacent room or even from outside. Consider placing tall, solid pieces of furniture against walls that are particularly prone to noise intrusion.
optimizing room layout for quiet zones
The layout of your room can also play a crucial role in managing sound. Creating buffer zones between noisy areas and quiet spaces is a simple yet effective strategy.
- Rugs and soft furnishings: As mentioned previously, thick rugs, carpets, and upholstered furniture absorb sound. Placing these strategically, especially in areas with hard surfaces, can dramatically reduce echoes and overall ambient noise.
- Room dividers: While not fully soundproof, heavy, fabric-covered room dividers or even large plants can absorb some sound and offer a psychological barrier against noise, making a space feel more secluded.
- Appliance placement: Position noisy appliances like washing machines, dryers, or refrigerators away from bedrooms or living areas if possible. If not, consider placing them in cabinets or enclosures designed to absorb their operational sounds.
Furthermore, consider the orientation of your bed or primary seating areas. If a specific wall is a source of noise, orienting your bed away from it or placing a large headboard against it can offer some relief. Similarly, positioning your work desk away from a noisy window can improve concentration. Even small adjustments in furniture placement can make a noticeable difference in how sound is perceived and managed within a room.
This method emphasizes leveraging existing resources and making conscious design choices to enhance your home’s acoustic properties. It’s a testament to the idea that soundproofing doesn’t always require extensive renovations; sometimes, a clever arrangement of what you already have can make a significant impact on your journey towards a quieter and more comfortable home.
planning your 6-month soundproofing timeline
Embarking on a comprehensive soundproofing project can seem daunting, but with a clear plan and timeline, it becomes a manageable and rewarding endeavor. Successfully implementing soundproofing home methods within six months requires a systematic approach, breaking down the project into achievable stages. This timeline provides a framework, but remember to adjust it based on your specific needs, budget, and the extent of the noise issues you’re addressing.
Month 1-2: Assessment and Sealing. Begin by thoroughly assessing your home for noise sources and identifying all air gaps. This involves careful inspection of windows, doors, electrical outlets, and any penetrations in walls and ceilings. During this phase, focus on implementing Method 1: sealing air gaps and reinforcing weak points. Purchase high-quality weatherstripping, acoustic caulk, and door sweeps. This initial phase is crucial as it addresses the most common and often easiest-to-solve noise problems, laying a solid foundation for further improvements.
Month 3-4: Structural Enhancements. Once your home is adequately sealed, move on to more structural soundproofing home methods, specifically Method 2: enhancing wall, ceiling, and floor insulation. This stage might involve more significant work, such as adding extra drywall layers, installing resilient channels, or incorporating mass loaded vinyl. For floors, consider sound-reducing underlayments or floating floor systems. This phase requires more planning, potentially involving professional help depending on the complexity of the chosen solutions. Focus on one or two key areas that suffer most from noise intrusion, such as a bedroom or a home office.
Month 5: Acoustic Treatment and Furniture Optimization. With the structural work largely complete, turn your attention to the internal acoustics of your rooms. Implement Method 3: incorporating acoustic absorption and diffusion. Purchase and strategically place acoustic panels, heavy curtains, and thick rugs. This is also the ideal time to apply Method 4: strategic placement of furniture and appliances. Rearrange heavy furniture against shared walls, optimize room layouts to create quiet zones, and ensure noisy appliances are positioned to minimize disturbance. This phase focuses on fine-tuning the sound environment and enhancing comfort.
Month 6: Review and Refinement. The final month is dedicated to reviewing your progress and making any necessary refinements. Walk through your home, paying close attention to any remaining noise issues. Are there still persistent echoes? Is external noise still bothering you in specific areas? This is the time to add a few more acoustic panels, adjust furniture, or perhaps invest in a sound-masking device. Celebrate your achievements and enjoy your newly found peace and quiet. This structured approach ensures that you systematically tackle noise problems, leading to a significantly quieter and more comfortable home within the promised timeframe.
maintaining your quiet home environment
Achieving a quiet home through soundproofing home methods is a significant accomplishment, but maintaining that tranquility requires ongoing attention. Soundproofing isn’t a one-time fix; it’s a commitment to preserving the peaceful environment you’ve created. Regular maintenance and mindful habits play a crucial role in ensuring your home remains a sanctuary from noise pollution.
Regularly inspect all the seals and weatherstripping you’ve installed. Over time, materials can degrade, shrink, or become damaged, creating new pathways for sound. Check door sweeps for wear and tear, and reapply acoustic caulk if you notice any new cracks or gaps around windows and door frames. These small, proactive measures can prevent minor issues from escalating into significant noise problems, preserving the effectiveness of your initial soundproofing efforts.
long-term strategies for noise management
Beyond physical maintenance, adopting certain habits and strategies can further enhance your home’s quietude. These include conscious choices about how you interact with your living space and the external environment.
- Mindful appliance use: Run noisy appliances like dishwashers or washing machines during times when their operation will cause the least disturbance, such as when you’re out of the house or in a different part of the home.
- Strategic landscaping: Planting dense shrubs or building fences can help absorb and deflect some outdoor noise before it even reaches your home, providing an additional layer of natural soundproofing.
- Consider white noise or sound masking: For persistent but low-level ambient noise that can’t be fully eliminated, a white noise machine or sound-masking system can help cover up these sounds, making them less noticeable and promoting a sense of calm.
Maintaining a quiet home also involves a degree of awareness about your own activities. If you have a home studio or a workshop, ensure that internal soundproofing measures are adequate to prevent noise from disturbing other parts of the house. Educate family members about the importance of closing doors gently, keeping music at reasonable volumes, and generally being mindful of noise levels. By integrating these practices into your daily routine, you reinforce the peace and comfort that your soundproofing efforts have brought, ensuring your home remains a haven of tranquility for years to come.
| Key Point | Brief Description |
|---|---|
| Seal Air Gaps | Address windows, doors, and structural cracks with weatherstripping and acoustic caulk to block noise entry. |
| Enhance Insulation | Add mass and damping to walls, ceilings, and floors using drywall, resilient channels, or acoustic underlayments. |
| Acoustic Absorption | Incorporate rugs, upholstered furniture, and acoustic panels to absorb sound and reduce echoes within rooms. |
| Strategic Furniture | Utilize heavy furniture and smart layouts to create barriers and buffer zones against noise. |
Frequently Asked Questions About Soundproofing
The time required for soundproofing varies significantly based on the methods chosen. Simple solutions like sealing gaps can be done in a weekend, while comprehensive structural changes might take several weeks or months. Our guide outlines a six-month plan for a complete home transformation.
Many soundproofing home methods, such as sealing gaps and adding acoustic panels, are highly effective DIY projects. However, for complex issues like severe impact noise or structural modifications, consulting a professional acoustic engineer or contractor is advisable for optimal results.
Sealing air gaps with weatherstripping and acoustic caulk is often the most cost-effective first step. It addresses significant noise leakage points with minimal investment. Beyond that, adding thick rugs and heavy curtains also offers good value for improving internal acoustics.
Complete elimination of all noise is generally unrealistic. The goal of soundproofing is to significantly reduce unwanted noise to a comfortable and manageable level. While some methods can achieve near-silence for specific frequencies, a total absence of sound is rarely achievable or even desirable.
The choice of materials depends on the type of noise (airborne vs. impact), the specific area being treated (walls, windows, floors), and your budget. Researching materials like mass loaded vinyl, acoustic panels, resilient channels, and acoustic caulk will help you make informed decisions.
conclusion
Transforming your home into a quieter, more comfortable sanctuary is an achievable goal with the right approach to soundproofing home methods. By systematically addressing air gaps, enhancing structural insulation, incorporating acoustic absorption, and strategically arranging your living space, you can significantly reduce unwanted noise. This guide has provided a comprehensive roadmap to achieve a peaceful environment within six months, enhancing your well-being and quality of life. Remember, a quiet home is not just about silence; it’s about creating a space where you can thrive, relax, and enjoy true tranquility.


